Original Norton DOHC Cambox(s) Stripdown - Summer/Autumn 2019

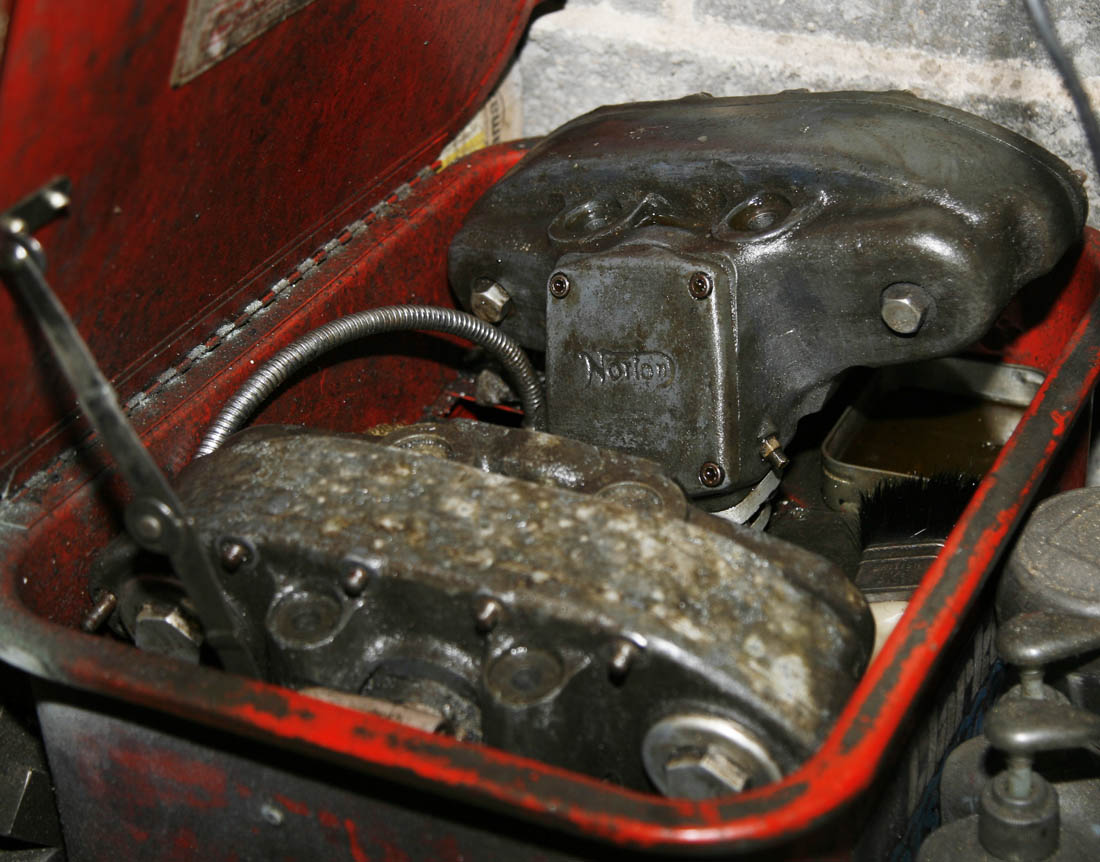
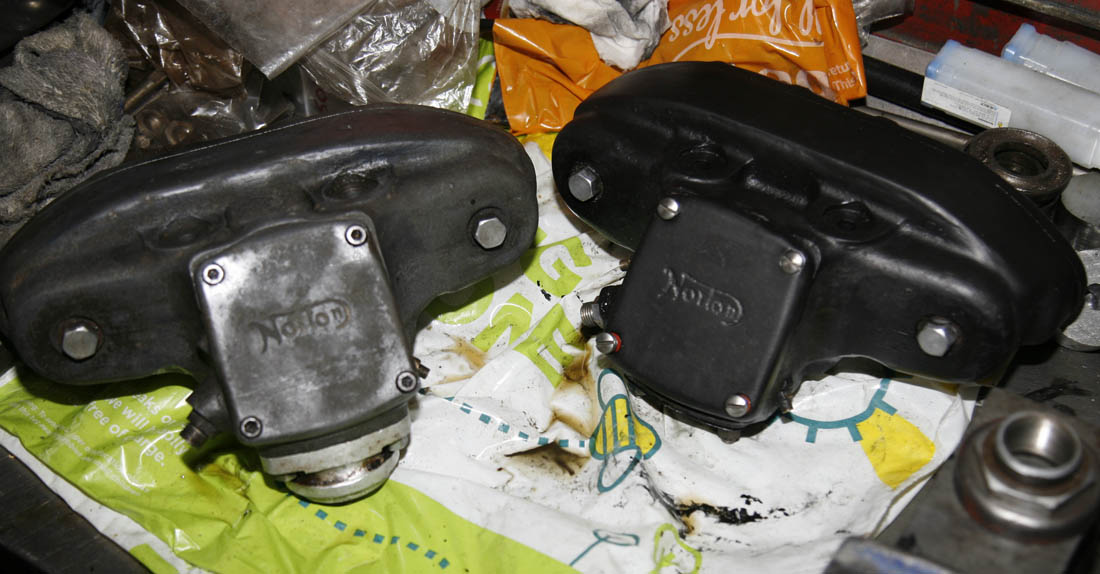
Two DOHC Cambox's sat on our dining room table, havng just got back from the Bonhams auction. As well as some obvioius corrosion and grottiness, they are still showing their 'Bonhams' Lot No tags
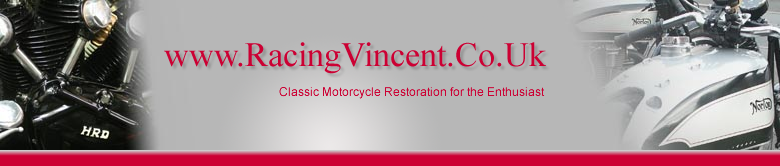
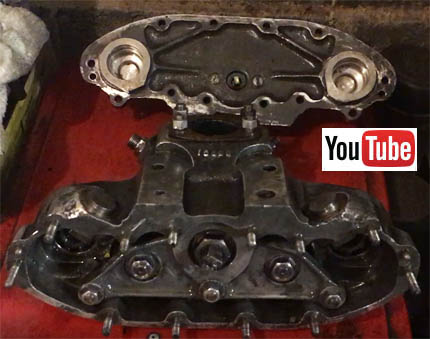
 Underside and rear photographed at the same time. If you look carefully, you can see the more complete cambox in the top left is missing its 'pushers' (and one pusher bearing), which allowed me to look inside before the auction and confirm it looked to have all its contents.
The less complete (and grottier) cambox - lower right, was more of a gamble as both pushers were still in place. Hoiwever, even allowing for the obvious lack of vertical bevel gear . . . I could tell it was lacking some weight - which I accounted for when bidding - it turned out to be a lack of cams/camshafts!
I recently published an article on an interesting visit to Bohnams Stafford Spring 2019 auction, which in anticipation of - I had crept up on my terrified looking Piggy Bank - and hit it with a large hammer!
If you havent already seen the article, it can be found here:
Bonhams 2019 Spring Stafford Auction
I wont bother duplicating what the Bonhams article already covered - save to say, that on getting home with my new spoils - I was now the proud owner of two rather corroded and second looking, but very original Shortstroke DOHC Manx Norton cambox's.
Both looked like they had spent the best part of 40 years in a very damp and dark place . . . but it is becoming increasingly difficult to find original racing parts such as these that have not already beem stripped, so by the time I had them home and on the dining room table ('er indoors was out for the day I hasten to add!) I was already looking forward with trepidation to what the insides of both might look like!
What To Do First?
Although not quite an 'Impulse Buy', it was only on reading the Bonhams catalog that had dropped through my door a couple of weeks before the auction that got me even thinking about DOHC Cambox's! Until that time I was bogged down with a host of other things going on - including trying to get the chassis painted on my Douglas 2 3/4hp project. However, as mentioned in the previous article, one of my future projects was the restoration of a 1950 DOHC Gardengate, for which I had a correct period Manx 500 engine, but only fitted with a SOHC cambox . . . not the correct DOHC Longstroke cambox. I know how difficult the early DOHC cambox's were to find, hence when I saw these later shortstroke cambox's come up along with a number of other interesting Manx parts, I could not resist checking them out - with the view that if a Longstroke cambox did not materialise, and I did get one of these - then I would make it fit!!
So, having gone to the auction with the intention of maybe acquiring one cambox - here I was on a Saturday evening, looking at two of them sat on the dining room table - but both were crying out - clean me and stop the corrosion!!
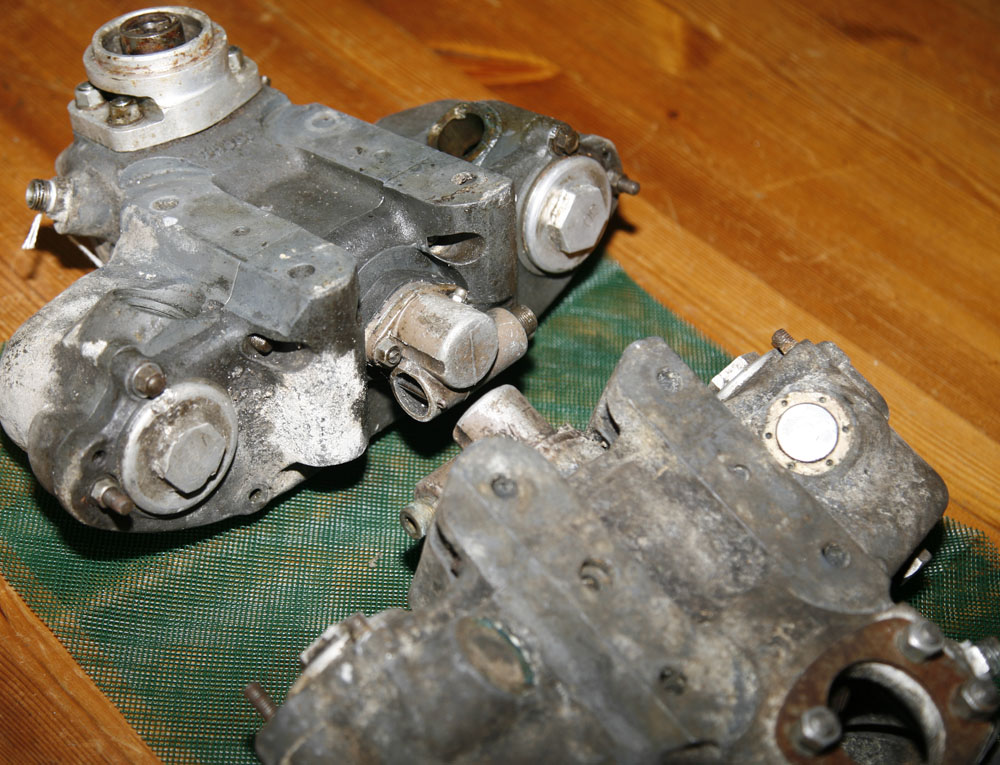
I could not resist loosely placing one of the Shortstroke cambox's on a Longstroke Manx head - albeit one that had no valves fitted. I confess that I purposely did not look too closely if the pushers were in line with the axis of the valves - because I thought it might put me off restoring them if it looked too far out - that is the weird logic I sometimes employ . . . much better to restore on a Wing and a Prayer - because I have already bought them now!!
Although in the top left photograph it gives the impression that the more complete cambox on the left was the more corroded - it looking very white both front and rear, actually looks can often be deceiving. On close inspection at the auction I could tell that part of the corrosion was superficial - and actually much of it might have been old Castrol R, which sometimes goes 'off' and looks like alloy corrosion.
In this case the second, less complete, cambox gave the most cause for concern - I could see that the corrosion was not just cosmetic and was starting to eat into the magnesium alloy quite badly - particularly on the top of the cambox. Therefore the decision was quite easy - although not really high up on my priority list, I should at least give these cambox's a quick cleanup before putting them away until later - and cambox number two was in the greatest need of attention first.
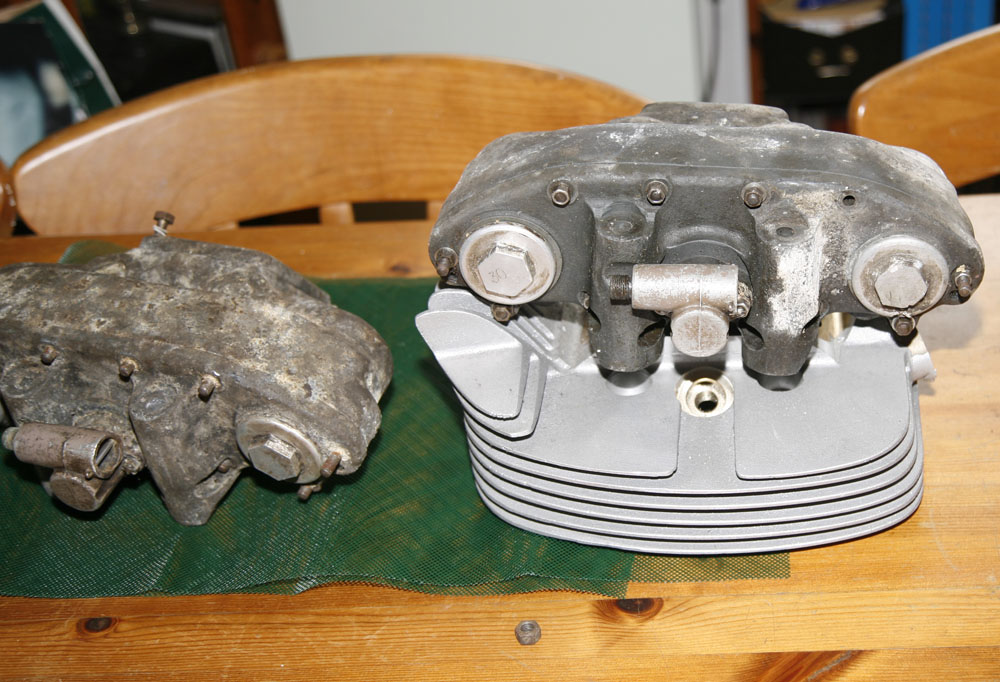
As well as the cambox's, one of the bids came with a small box of trinkets from the same collection (I think it was the more complete cambox, because it had the missing 'pushers' in the box among other things. As well as very second hand pair of bent shortstroke valves was a good condition late type Big End (although rollers kaput), a pair of second hand Main bearings - but also a few gems; an almost new set of oil pump gears (Manx type, slightly different to Inter), a nice DOHC Manx inlet stub and a DOHC Mains Top Hat conversion (as per Works bikes I gather and also offered by Bill Lacey - my 55 ex Surtees DOHC has a similar Lacey conversion). And all supplied in a lovely ;60's period Smiths rev clock box!
Originality vs Practicality, Let Cleanup Commence . . .
I am really not a DOHC cambox expert, andl although I own a really nice (and potent) '55 Doubleknocker, I have not had need to look inside the cambox in the years I have owned it. Therefore, with both these camobx's sat on our dining room table on the eveningt I had purchased them - I was debating how to tackle them. I had lots of other work on - and these were more for a future project (a backstop solution for my 1950 DOHC Gardengate project bike), but neither did I feel I could just spray them in Duck Oil and just pack them away - without doing something to clean them up and check out their overall condition.
However, as I carefully examined them and just soaked up their untouched original condition - what did occur to me was how nice and unusual it is to find original race parts that look as untouched and unmolested as these are. Yes, they were looking a bit worse for wear - but they also looked great time capsules - very original and on the face of it, in pretty good structural cdondition, with not much sign of misuse or having been previously disasembled with a large hammer!
So, while sat there on Saturday evening with a glass of wine in my hand, and feeling pretty pleased with myself for having taken the risk of buying both of them - I made a relatively simple decision to try and sympathetically cleanup both cambox's over the coming weeks - but other than mechanical necessities, would attempt to re-use as many original parts as possible and would just cleanup and check completeness of the less complete cambox, putting the major effort into making the more complete cambox a possible usable solution for the 1950 Longstroke engine I had for the '50 Gardengate.
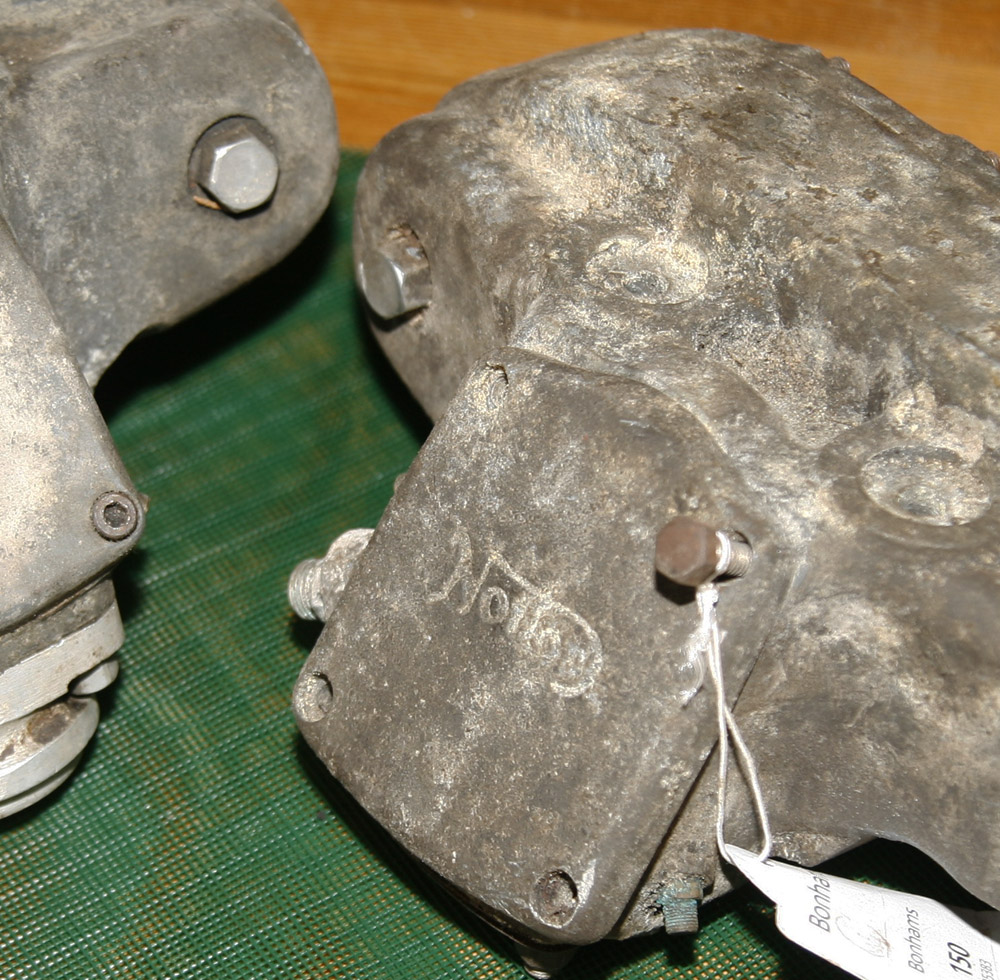
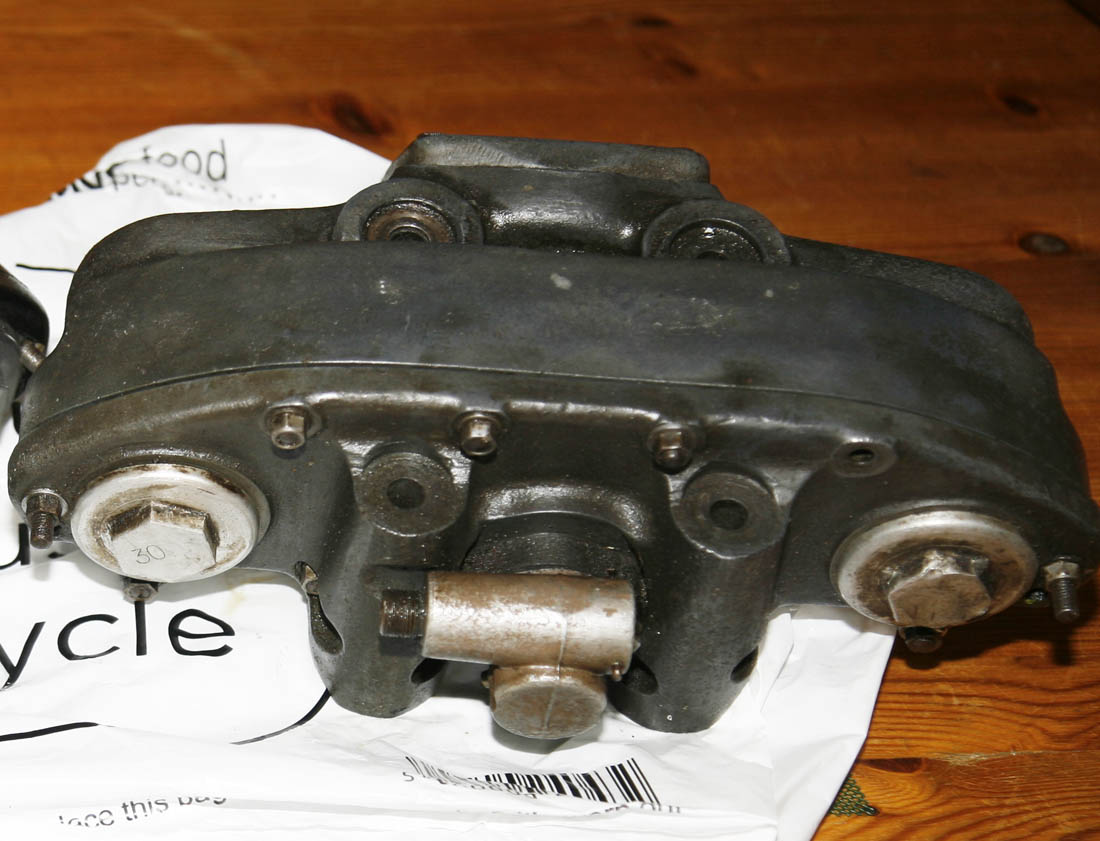
Click on the photo above to see a bigger version which shows it more clearly - but this closeup of the second (less complete) cambox shows the heavy corrosion which was more worrying than the other cambox, which was more superficial. Particularly, the top left corner, it was evident that years of dampness and corrosion had started to take its toll, and was starting to bite into the magnesium alloy under the chromating.
So it was a no brainer that before packing this cambox away - I needed to give it a quick cleanup and stop the corrosion getting any worse. Note the original and corroded valve guide oiling union at the lower front of the cambox
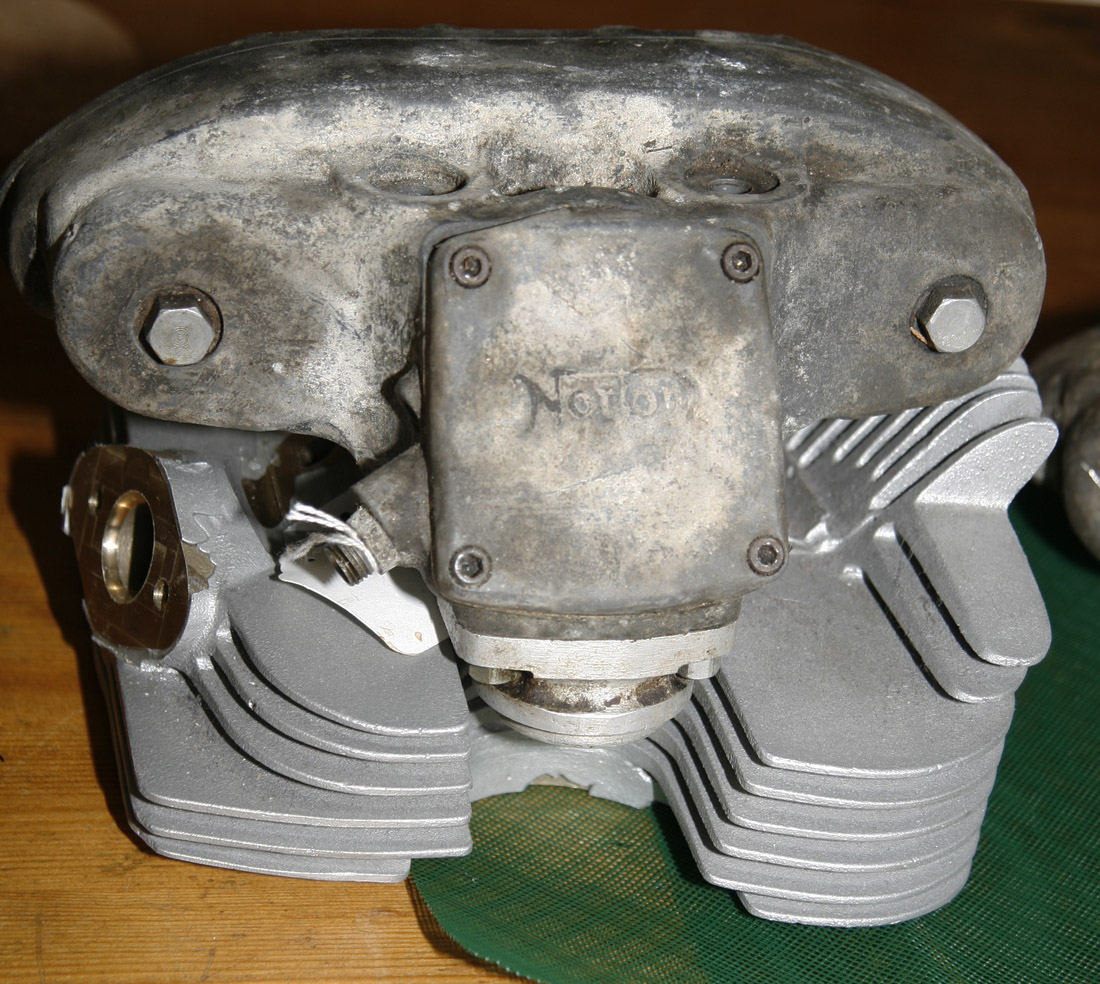
Another picture of the more complete cambox loosely fitted on a Longstroke Manx head. As well as just a general check out for size and fit - it is a good way to get the juices flowing! Original early DOHC cambox's are visibly different and easily identifiablable from this shortstroke cambox - as they have additional spindle heads showing inboard of the two cam spindle nuts - although the general shape and profile was the same
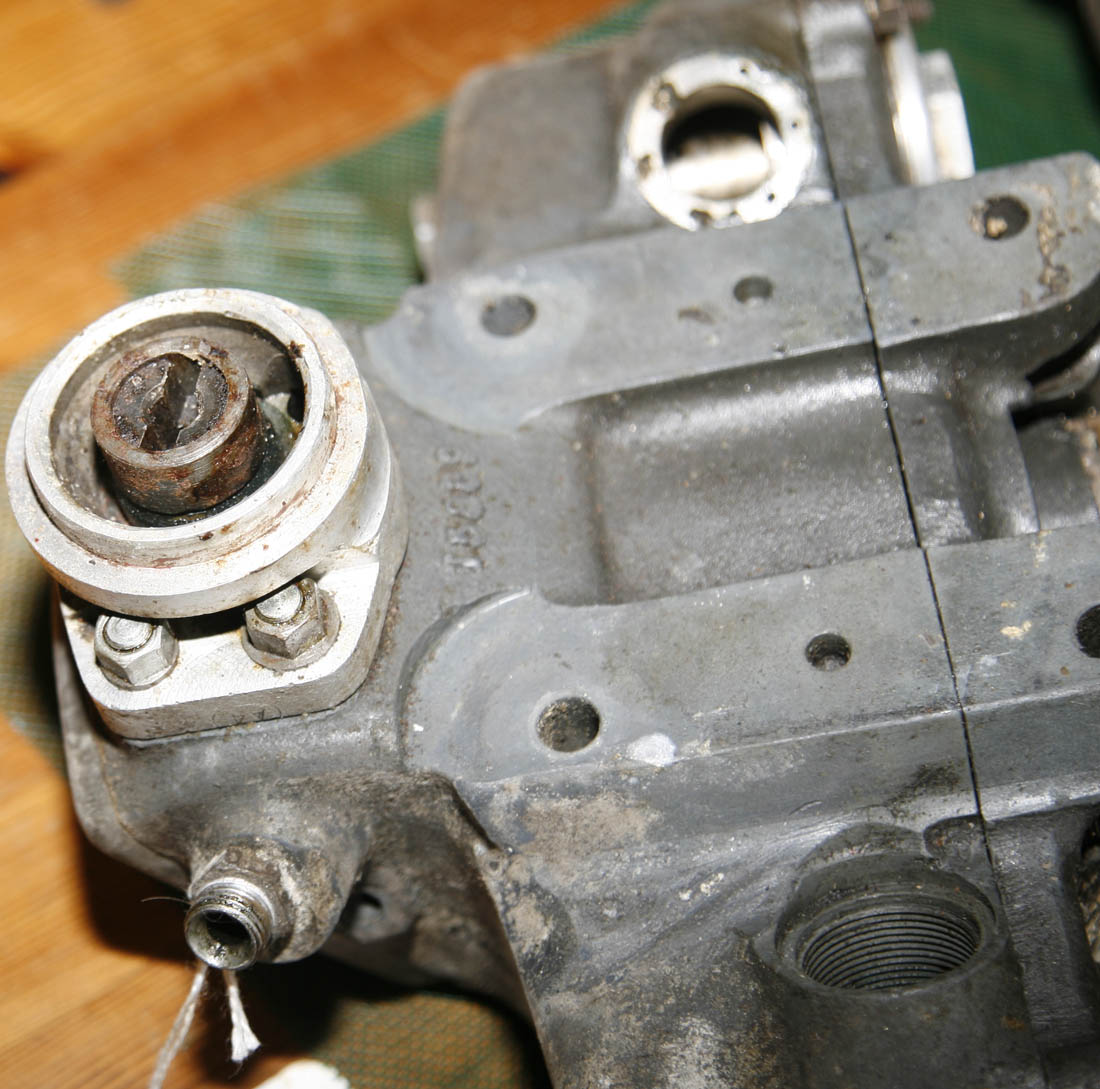
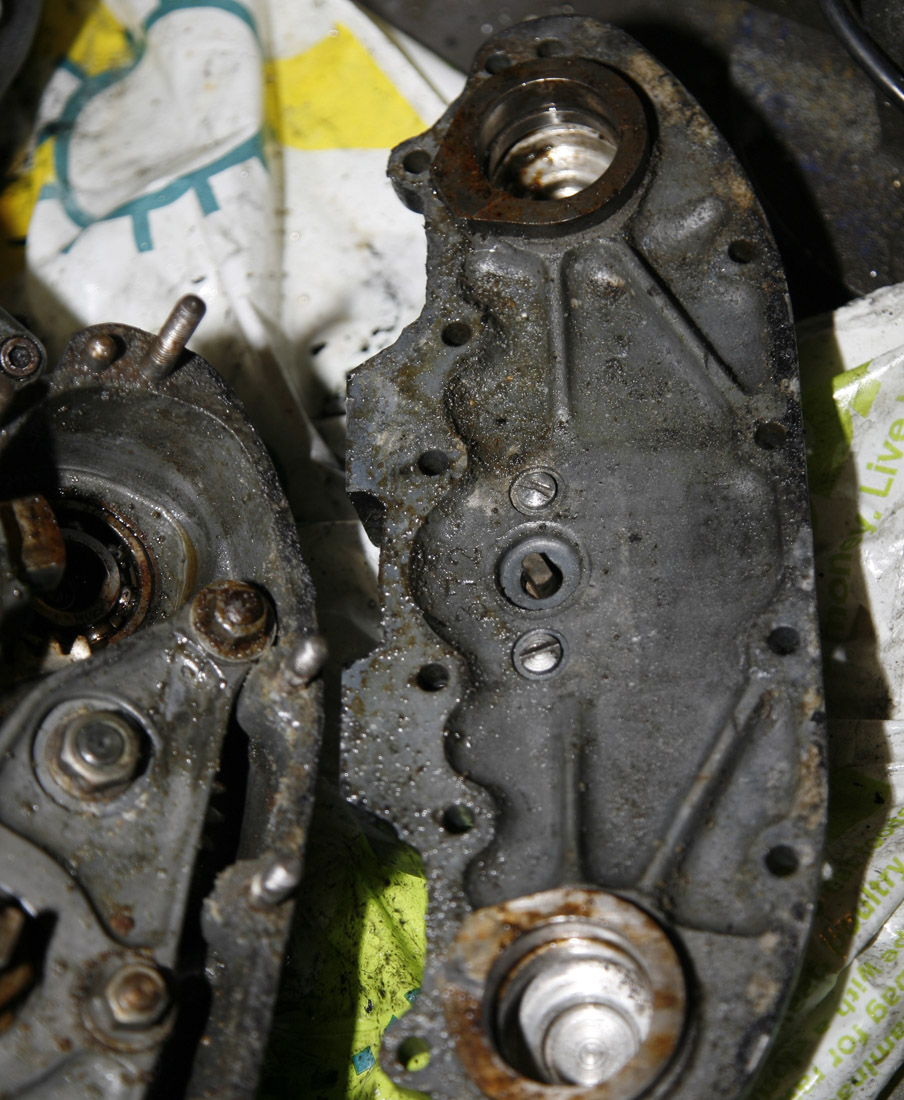
Underneath of Cambox N01 shows some interesting points:
firstly, it comes very complete - which includes the vertical bevel gear and allioy vertical bevel casting, as fitted to shortstroke heads . . . very different to the Londstroke DOHC vertical bevel casting .. . so if i am to use it on a Longstroke engine that will have to be changed. The DOHC Longstroke bevel casting is different to the SOHC version that I manufacture, and at the time of purchasing the cambox's I did not have one in my collection of parts - more of that later.
However, if you look closely, in this photo you can see in the top of the photo the exhaust pusher bearing is still in place - but its mounting holes are knackered - no doubt what stopped the previous owner from completing it. The lower (inlet) pusher bearing has been sucessfully removed, and thread still looks good. As can be clearly seen in this photograph - shortstroke DOHC canbox's have a flat surface machined on the base, which as well as allowing for the 4 cambox bolts, also have holes to fit two mounting dowels in the middle . . . ensuring they match up perfectly to hte head. Early Longstroke DOHC cambox's did not have this feature - relying on interim 'platform' spacers between the head and barrel at each of the 4 cambox bolts.
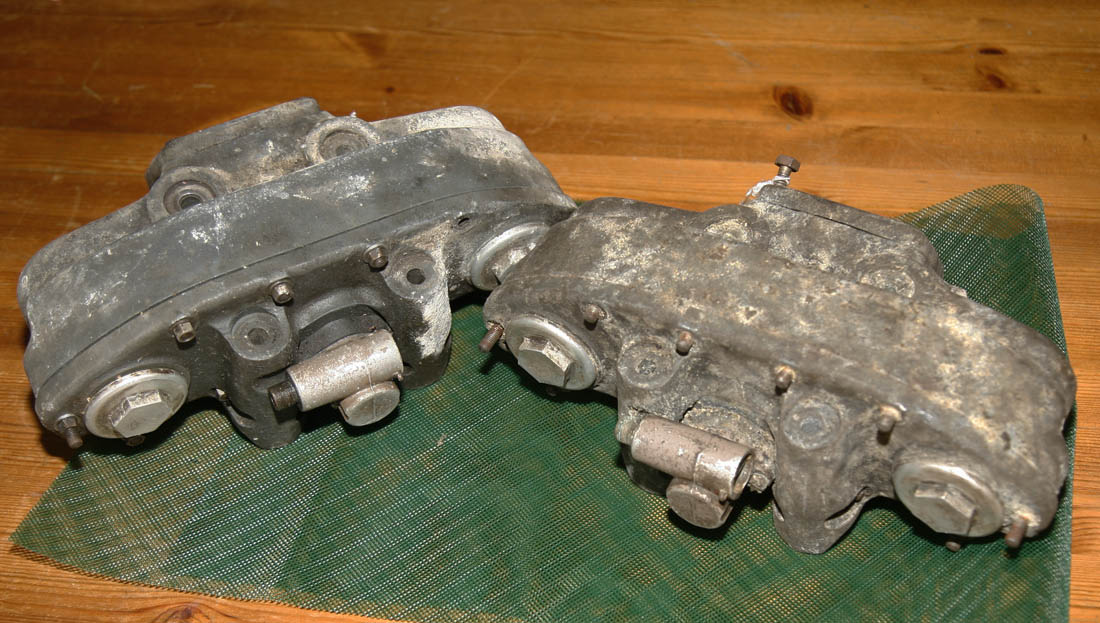
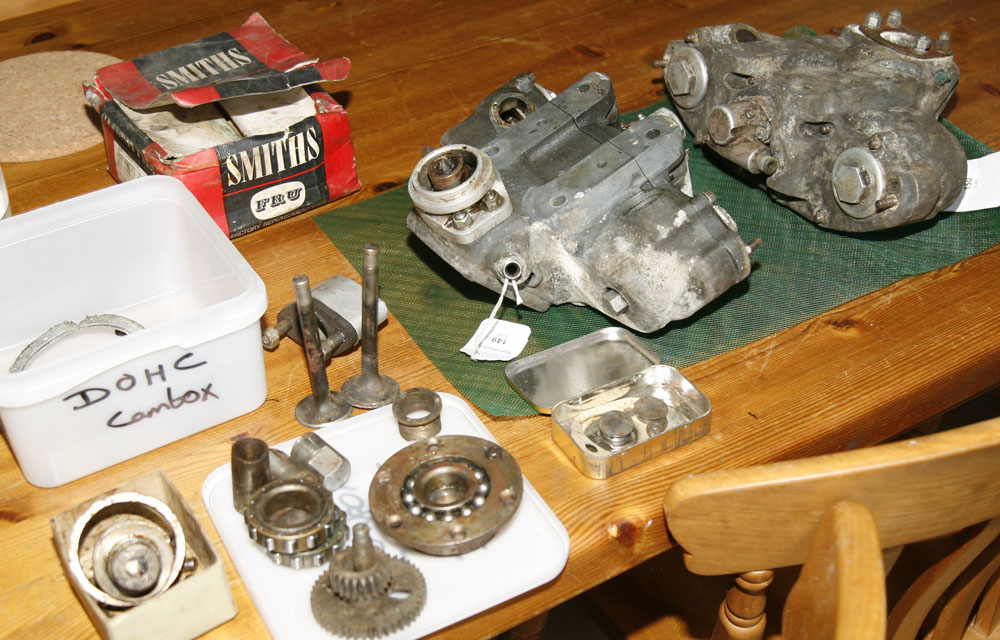
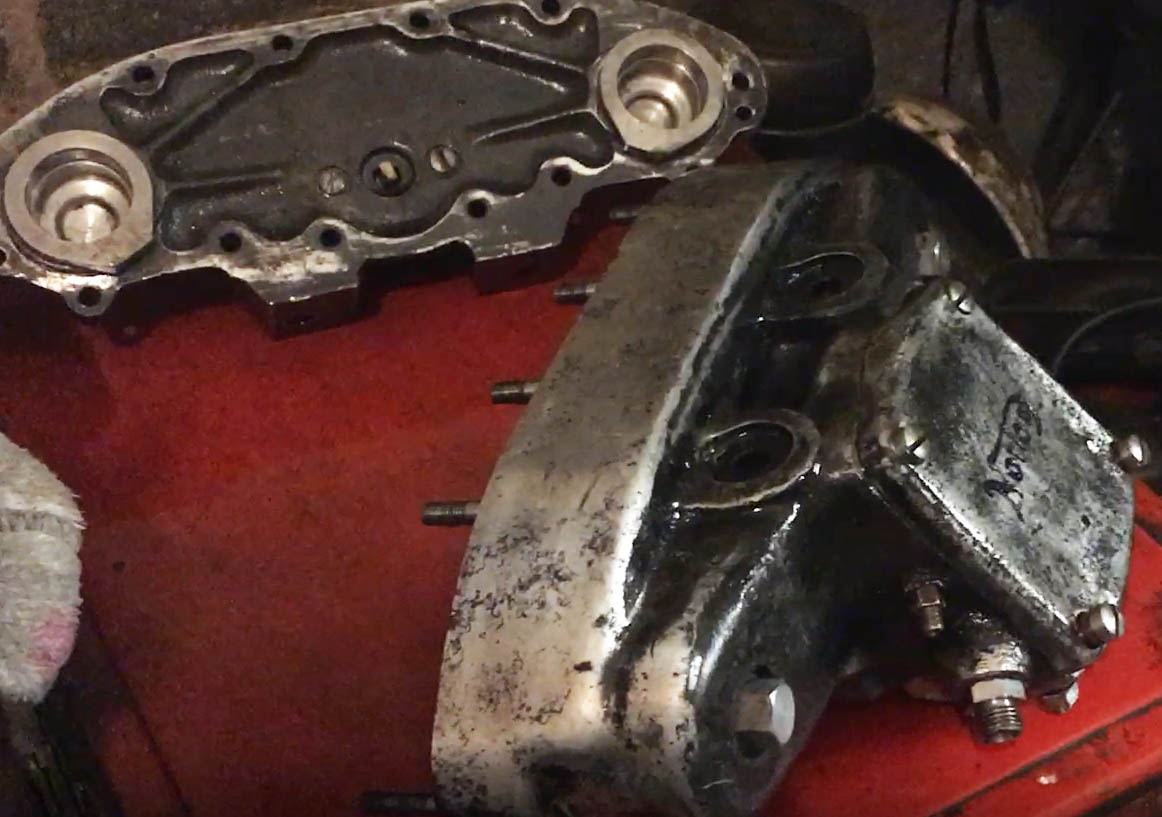
A final picture of the two cambox's in 'As Bought' condition - this photograph clearly shows the amount of magnesium corrosion to the less complete cambox in the right on this photograph - hence the decision to strip and cleanup this cambox first was made very easy.
it is also worth noting some other interesting points about these cambox's:
Both are fitted with the original Smiths rev clock gearbox's - very nice . . . and notice the original beige paint, an original feature I intend to keep.
Then you will notice that each cambox has alloy caps over the camshafts. These covers are often (but not always??) stamped with either 30 (signifying 500cc) or 40 (signifying 350cc). Although a couple of them looked tatty and knocked about - they are not cheap items to replace (Andy Molnar sells them if you need one) - so I wanted to try and clean them up as best i could. it is worth noting that the two outermost studs on DOHC cambox's are longer than the other studs, to allow for a pressed steel plate with a hex shape stamped out that can be placed over the caps . . . to ensure the caps cannot unscrew in race conditions. These were the only obvious items missing from both cambox's as purchased.
final point to notice: You can clearly see in this photograph that both cambox rear covers have the rear cambox bolt holes cast into them. This is the most obvious difference to the very first DOHC Longstroke cambox, where the rear 'cambox to head' mounting holes were part of the main cambox casting, not the rear cover - the design being similar to the SOHC cambox. However, there was an interim Longstroke design where the main cambox casting still had
4 nuts showing (2 for camshafts and 2 for the middle gears), and then this final Shortstroke design - which only had the outer camshaft nuts
visible on the main casting, and rear cambox bolts built into the rear cover.
First DOHC Cleanup/Strip - Cambox No2: the less complete cambox
First task before doing anything else was to give both cambox's a wash in a De-greaser bath and try and remove the worst of the dirst and loose corrosion, without removing any more of the original chromate than necessary. I normally use a plastic bristled kitchen scrubbing brush to help with this
Lets cleanup the More Corroded (2nd) Cambox First . . .
So, as I said in the section above - I had bought the second cambox at the auction because the 'price was right' - and although a bit of a risk, if all went well it might provide a workable 'spare' cambox or as a future possible swap.
I did not want to spend a long time working on this cambox now - but knew it was in desperate need of a cleanup, and removal of the corrosion that was clearly just starting to bite into the magnesium alloy - particularly on the top suface of the main casting.
Well - there's a suprise!!
First thing to do with the less complete cambox (after spraying everything down in Duck Oil after the degrease) was to remove the rear camshaft alloy cover. It was no suprise to find that the cam's and camshafts were absent. Well - that would explain why this cambox felt like it weighed less than the other one when I inspected them before the auction. So no suprrises - I was pretty much expecting this
Therefore - I decided to strip this one first, but not with the intention of a full restoration - just inspection, cleanup and removal of any corrosion, before re-assembling with fresh oil and alloy protection.
I am pleased to say that the reality followed the plan pretty much spot on. It was with some trepidation I stripped the covers off - not knowing what I would find missing inside. However, it became apparent very quickly that the reason for the weight difference between this and the main cambox was because its camshafts had been removed - but everything thing else seemed in place and original unblemished. Therefore the subsequent stripdown and cleanup went pretty much to plan, a couple of weeks later it was back in one piece again and rather than
removing bearings at this stage and putting the castings into a Chromating bath - instead at this stage I just painted the castings in a high temp matt black cylinder paint. After all - I knew if I did want to use this cambox in a future project - I would need to strip again, and purchase new camshafts (which Andy Molnar at Molnar Manx can supply)

To make up for the camshafts being absent though - both this and the other cambox did have it's original (greased type - see the nipple at its base) rev clock gearbox's in place . . . and still painted in the original beige pain and castellated mounting nuts. When I talk about a sympathetic restoration - it is keeping period touch's like this in place and not trying to restore in any way (not to mention that having to purchase one of these gearbox's is a pretty expensive exercise in itself - £250+ if you can find one)
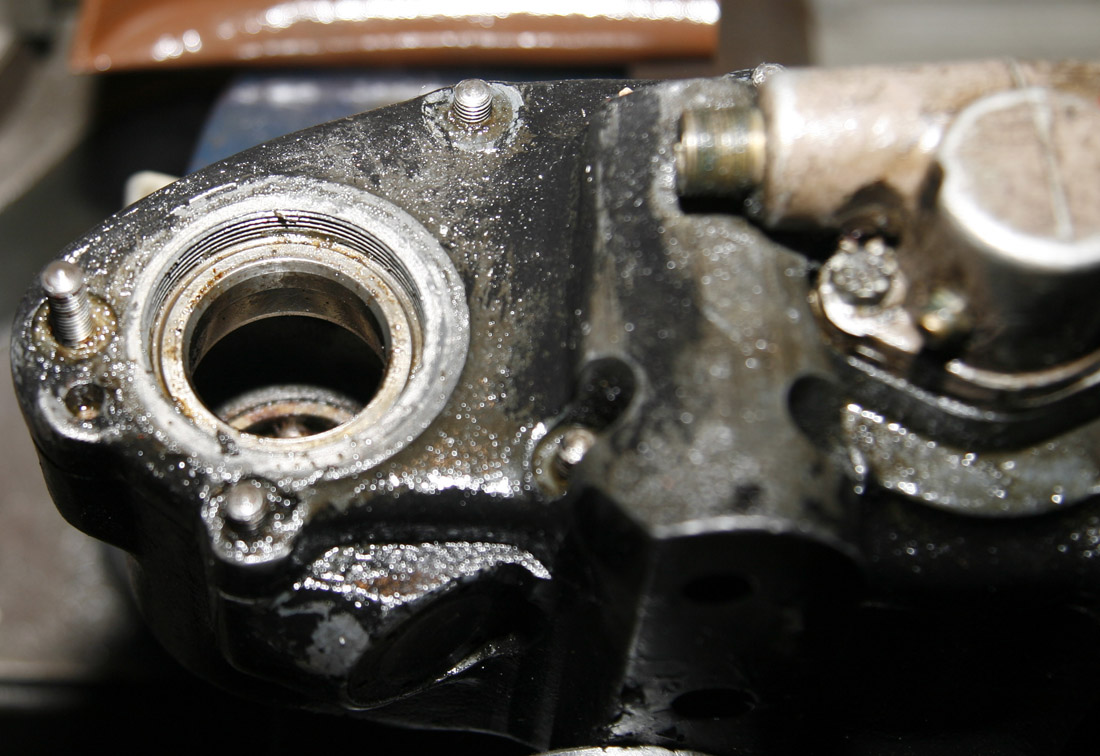
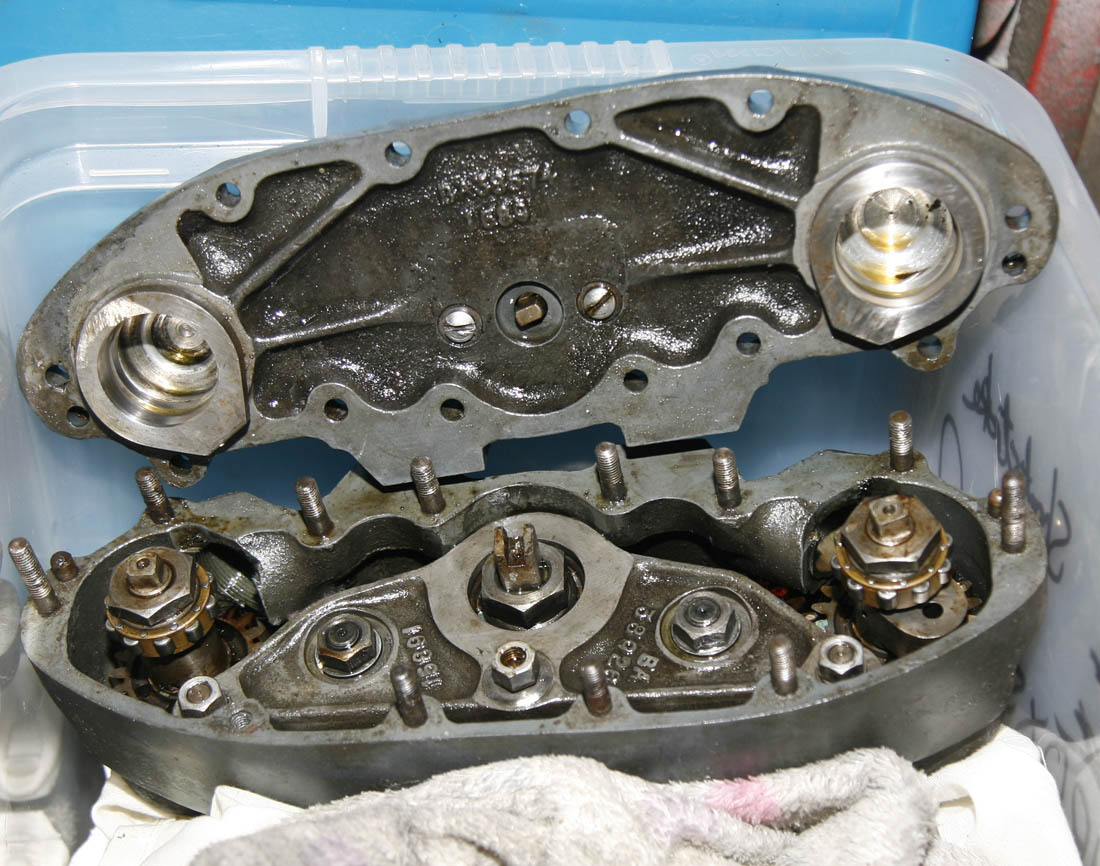
On removal of the rear cambox cover I got to see what there was inside - and the overall condition. I was pleased to see that - as hoped, the previous owner had just removed the cams/camshafts - but everything else seemed to be there and complete. Note camwheel outrigger plate - a lovely looking casting and looking very original and unmolested. There was the expected signs of slight damp corrosion and dried Castrol R, but all superficial - overall condition looked very good - which was pleasing to see
This picture of the rear cambox cover at the same time shows a similar story - only superficial corrosion and mostly the original dark blue/ grey chromating. I doubt this has been stripped since the '60's and all the faces were crisp, showing it had led a reasonably well looked after life when in use. Notice distinctive damp corrosion signs around mating faces though - that needs to be removed. From a technical perspective - notice that DOHC cambox's have distinctive outer camshaft bearing outer races shrunk in. Luckily the corrosion to these was superficial as well and not affecting the race track
Another picture of the cambox and rear cover, on initial stripdown. Thsi photo shows the multitude of rear cover studs - all looking in good original condition, as well as other features. Note that the DOHC cambox central camshaft is different to the SOHC cambox camshaft in two specific ways: 1. it carries a central gear - not cams (Duhh!), but also it has an extended end with tang in it to drive the revclock drive in the rear cover - more of this later when we come to the more complete cambox stripdown.
As you can see - the more complete cambox is in the background and I had also removed the worst of the external corrosion - looking much better. This was sprayed in Duck Oil an put away for later
This picture shows the cambox after it had been stripped and cleaned up and just before putting the rear cover back on.
You can clearly see here that I did have to linish back the top surface of the shell, where the magnesium corrosion had started to bite in. However because this is a smooth surface with plenty of meat, the final effect of doing this is hardly noticeable - it looking almost indistinguishable from before - other than the bare magnesium alloy now showing through. Likewise the other casting surfaces and machined gasket faces - there was no point trying to save the chromating, far more important to ensure all traces of corrosion are removed, before packing away for the moment

On first impression, this photo (acually it is a still taken on my I-phone, when making a video of the free running of the gears - see below) does not look massively different from the photo taken on first stripdown - but actually, the innards are now very different - all the mechanical parts have been stripped, cleaned, de-rusted and reassembled with nice clean mineral oil (not Castor oil, because I do not know how many years it will be until I use or swop this cambox). Because this was a 'spare' cambox and this was just a superficial cleanup - I had not removed the bearings to allow for chemical 'Re-chromating' of the shell. I had decided I would paint this one matt black for now - which I did shortly after taking this photo

Rear of cambox after final assembly. I havent gone too much to town at this stage on presentation - as at some point it will need stripping again if to be fitted to an engine . .. but the rear cover was touched up wiht black paint wherever bare magnesium alloy was showing - always important to ensure mag alloy not exposed to the air if possible. It was also sprayed in Duck Oil - definitely the best protection for mag alloy, irrespective of if chromated or not.
Notice rev clock gearbox still sporting its original ochre paint
Final photo of the second cambox on the right, after being given a couple of coats of high temp matt black paint. I also treated it to a pack of 4 cheesehead stainless screws from my own SOHC parts stock - they are the same dimensions. Although paint is a poor substitute for chromate - it normally starts to peel off as soon as you start manhandling castings in use, it will help protect and make the cambox more presentable in storage until re-visited.
Main cambox is on the left in this photo (notice it also has alloy vertical bevel housing attached). At this stage superficially cleaned, but not stripped yet - that is the next task!
Final Thoughts On This Cambox
So, having spent approximately 2 weeks stripping this cambox, cleaning and de-corroding it . . . did I think it was worth the risk of purchase? - of course it was, I am over the moon with it! Considering how difficult it is to find any original DOHC cambox parts, to find a relatively complete cambox (i.e. only missing camshafts and cams) which has cleaned up so nicely is a real bonus - to go alongside the main reason for my attending the auction, the purchase of the other cambox, which I cover in the section below.
As it happens - although the main castings will need re-chromating at some point in the future, and camshafts will need to be purchased (Andy Molnar sells them), the rest of the cambox looked to be in suprisingly good condition - and although bearings might need further cleaning to remove traces of hard castor oil, on the face of it, there is very little left to do to make this a good usable cambox ready to drop on a working engine. Even the pushers were in place and seemed relatively stiff in their bearings once cleaned. I won't know if they are worn enough to leak until the cambox is used in action - but I am quitely confident they should be ok.
However, this being the first DOHC cambox I have actually stripped down and worked on in detail - the over riding impression of it was - what a brilliant piece of engineering workmanship it was!
In design, it may not have been as advanced as the Gilera/MV 4 cylinder GP engines, or the Moto-Guzzi multi-cylinder racers of the mid '50's, but considering this GP engine was available over the counter to privateer racer's, It is head and shoulders above most other British motorcycle designs that were around at the time . . . comparing it to - say a G45 road engine inspired race bike, or most other single cylinder road bikes of the time is like comparing a thoroughbred race horse to a donkey!
As well as being a pleasure to work on - it was also apparent that this was a design that had been come to through much trial and error - as well as high quality parts being used (roller bearings etc), there was a feeling of robustness and sturdiness of construction - the difference between an engine designed just to compete in the odd short circuit club race, and that of engine designed to last the full distance of a premier class Grand Prix.
So, with a bit more knowledge of how these cambox's were put together - I now moved on to a more thorough stripdown of the main cambox - see below.
I did a short video clip (with my I-phone, so quality not brilliant) of this cambox just before I put the rear cover back on.
At this stage I had stripped down and thoroughly cleaned all the gears and mechanicals. I had removed all traces of corrosion from the alloy - although at this stage had not repainted.
As the gear train felt so free running - I decided to see what happened when I played an air gun on the front bevel gear - and was suprised to see how freely and quickly the speed built up . . . not to mention the gear noise
Click on the picture above to go to the Youtube link of this video
Second DOHC Cambox Cleanup/Strip - Cambox No1: the main/complete cambox
Starting point for the stripdown of the main cambox. At thsi stage the cambox has been washed/degreased and the worst of the old Castrol R and surface corrosion has been carefully scrubbed off with a nylon bristled kitchen brush - at this stage I have still not looked inside!
Main Cambox Stripdown.
So, moving next to the cambox that was my main reason for attending the Bonhams sale. This one - as far as I could tell from the inspection I gave it at the auction, looked and felt in weight fully complete and as well as coming with front cover and rear rev clock gearbox, included the (shortstroke) vertical bevel housing - complete with vertical bevel (a bonus in itself, as these bevels cost approximately £300 on their own if needing to purchase new).
A mixed blessing was that one of the 'Pushers' was out and the bearing removed - which allowed me to get a peak inside, which told me the camshafts looked to be in place. However, I could see that the second pusher bearing was badly chewed - and no doubt locked solid, possibly the reason it was stood up many years ago.
So, first step of the stripdown - after carefully cleaning the worst of the external corrosion and old Castrol R off, was to take the covers off and see what I had bought!:
Rear cover off and all is revealed!
And actually - what a pleasent surprise. On initial impressions everything looks in good condtion and wonderfully unmolested. And yes - both cams and camshafts are in place!
I thnk when I took this photo I had already sprayed light oil into the camshaft outer races on the rear cover and cleaned out the old Castrol R gunk - notice the outer race lips that face down in line with the main pusher axis - there is a flat on each pusher that corresponds with this unusual feature and stops the pushers from rotating - clever design
The accompanying photos show what I found on opening the rear cover - and although jumping ahea a bit, I am pleased to say there were no nasty suprises - considering the grunge and corrosion on the surface, and the period of time the cambox had been stood up - it looked really nice inside. And of course . . . one of the benefits of it having been stood up for so many years - it had no further use and abuse since it was last used (probably early 1960's?). I will not write any more about the stripdown here - instead I will add the text to the photos below - which are shown pretty much in the order I stripped the cambox down . . . but save to say, it was a real pleasure to strip down such a time capsule of 1950's GP engineering - particularly knowing that almost every part was original factory Norton, not modern replacement:
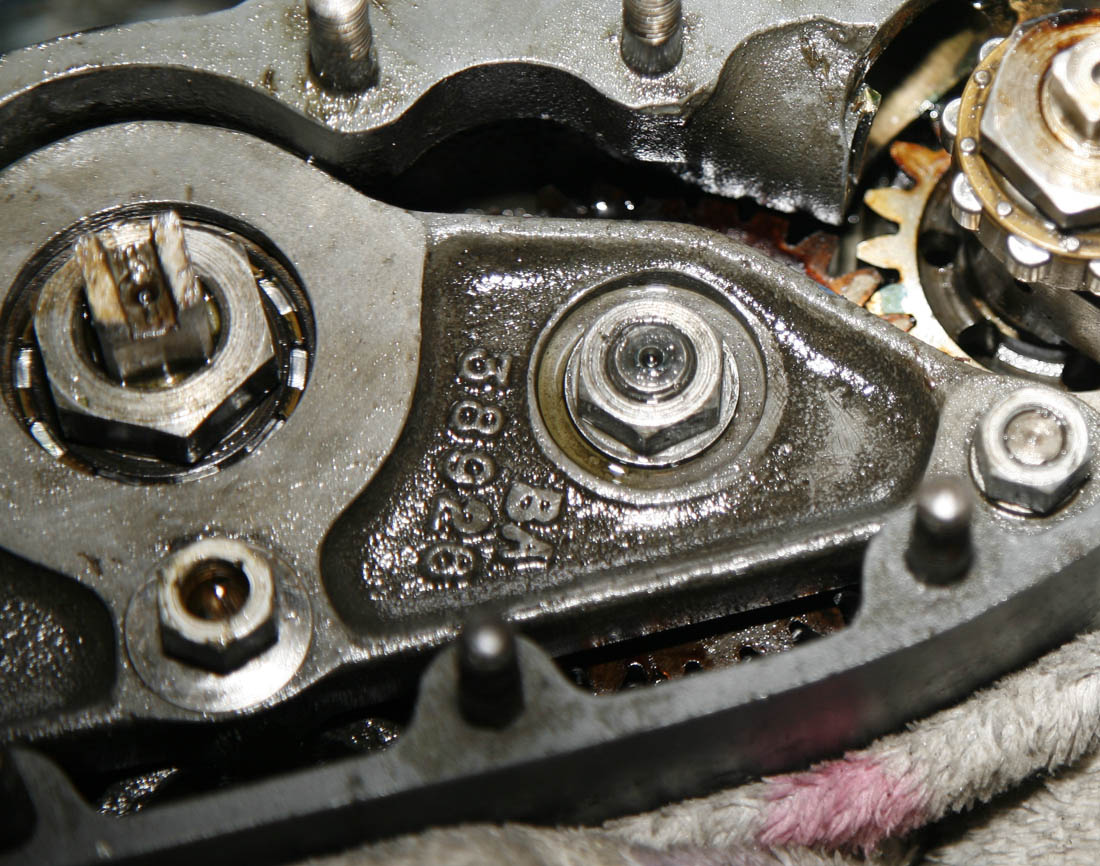
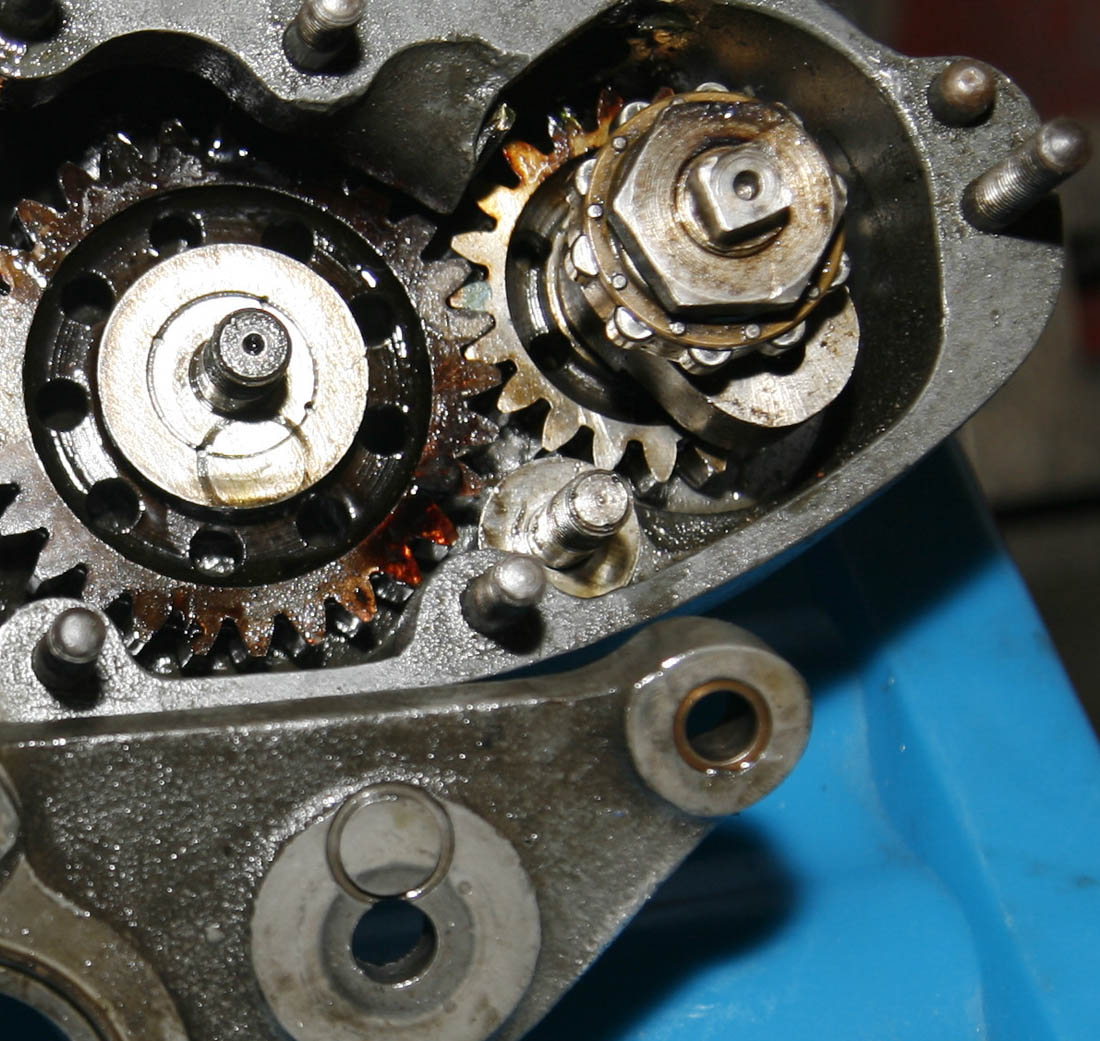
Here is a closeup of the idler gear/bevel gear outrigger plate - which is substantial and beautifully machined magnesium casting. It has hard metal dowels inserted into the alloy, so it is very good - tight fits onto 3 cambox studs and the two idler spindles. Here you can just make out the BA casting number. Bevel shaft (which is the camshaft on SOHC cambox's) shares same LH nut and roller bearing as the SOHC cambox, but in this case the outer roller race is shrunk into the outrigger plate, while on SOHC engines it is shrunk into the cambox rear cover
Closeup of the inlet camshaft and camwheel on the other side of the cambox. You will notice another similar roller bearing and LH nut, but in this case the camshaft has the same square end as the SOHC camshaft. I was suprised how tight fitting the outrigger plate was to the cambox shell at the furthermost mounting point, shown in the lower part of this photoraph. Next job was to remove the outrigger plate
Here you can see I have removed the idler gear spindle nuts and am just undoing the three mounting stud nuts. This is where things started to get a bit more fiddly and tricky. Having undone all 5 securing nuts, I was kind of hoping the outrigger plate would just slide off - maybe with a bit of light jiggling required. In this case - no such luck. It was probalby not helped by the old Castrol R having turned to glue, but with the close fitting nature of this plate, and that evertyhing had been machined to tight tolerances, although not locked solid - the outrigger plate did not want to come out easily.
Not being a DOHC cambox expert (understatement!), I do not have any special tools for doing this, so used a variety of non-destructive tools I had to hand in an effort to prise off the cover (including fingers - which quickly proved unsuittable and risked damaging my nail polish . . .
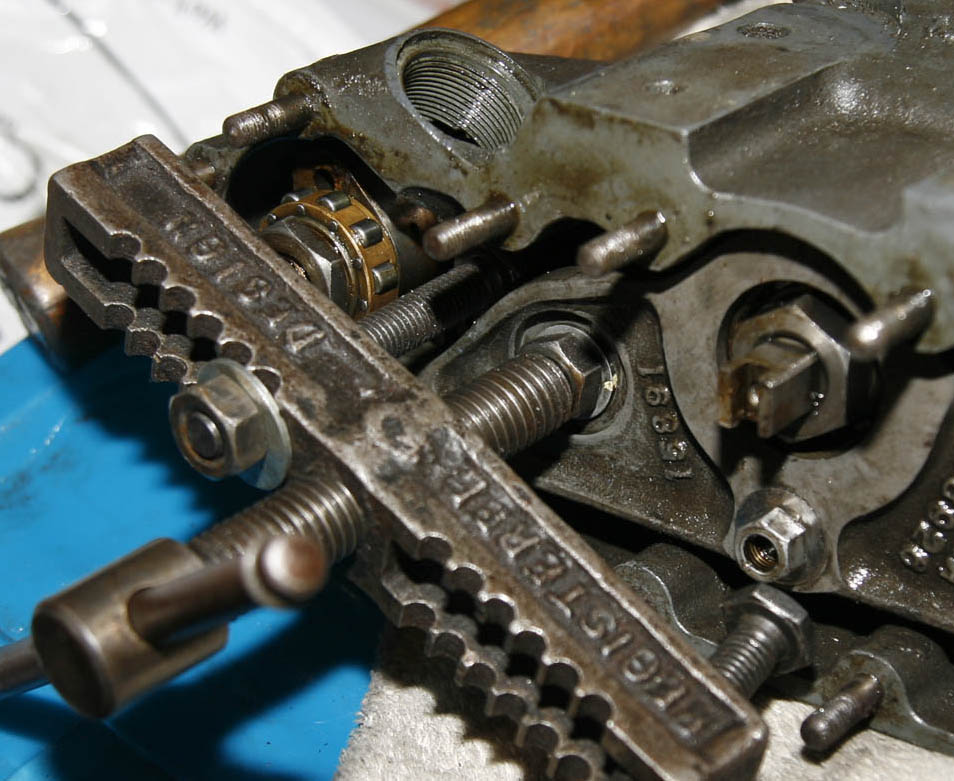
. . .and amazingly - this large and crude piece of puller technology proved the only one of my many pullers that could get in the various cranny's, without doing more damage than good! It was enough to loosen off the outrigger plate, to the point where I could take over with hands and jiggle it off.
By the way, this puller was one of a number of old pullers I inherited from old mentor C.E (Titch) Allen many years ago . .. possibly of 1920's vintage - but still does the business!
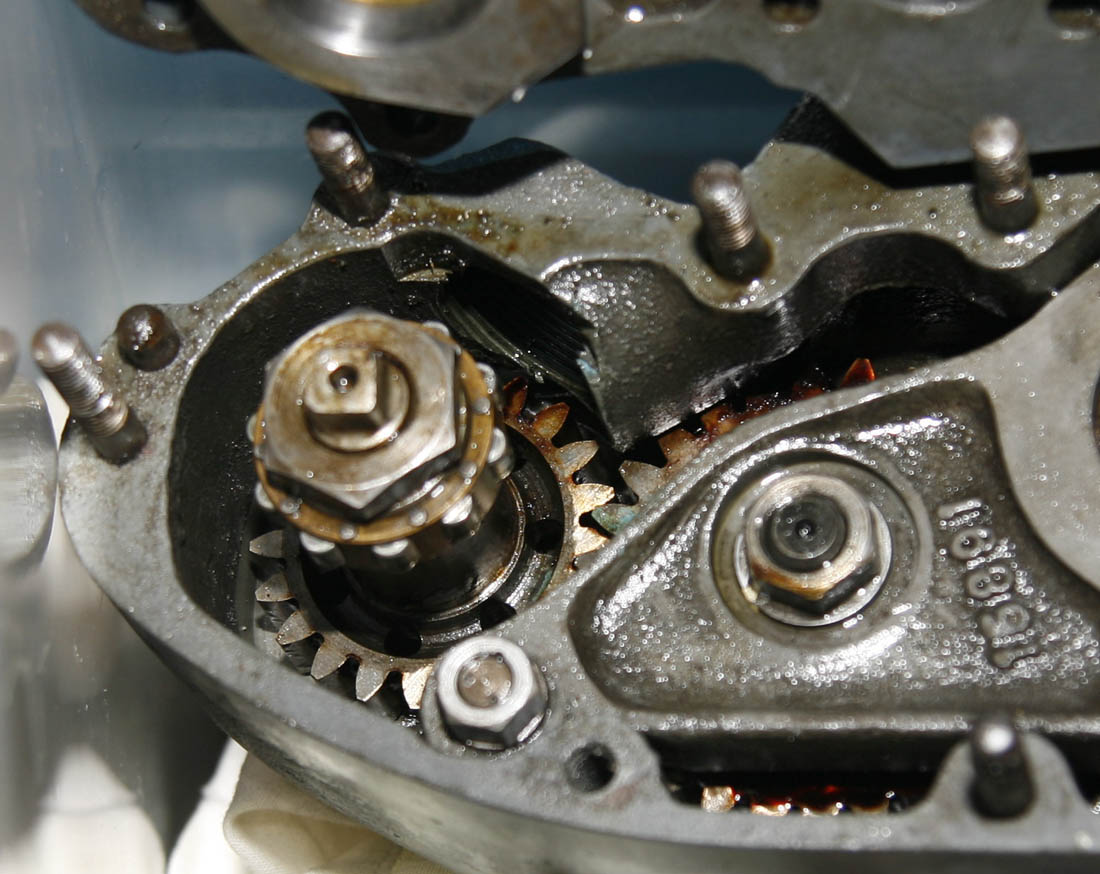
As an aside, this photo gives a good view of the inlet pusher area, which had had the pusher bearing sucessfully removed by a previous owner. It was looking through this orifice at the auction that confirmed to me the camshafts were still in place - unlike the other side, where the bearing and pusher were still in place, but the bearing chewed
Ahhh - finally got it off!
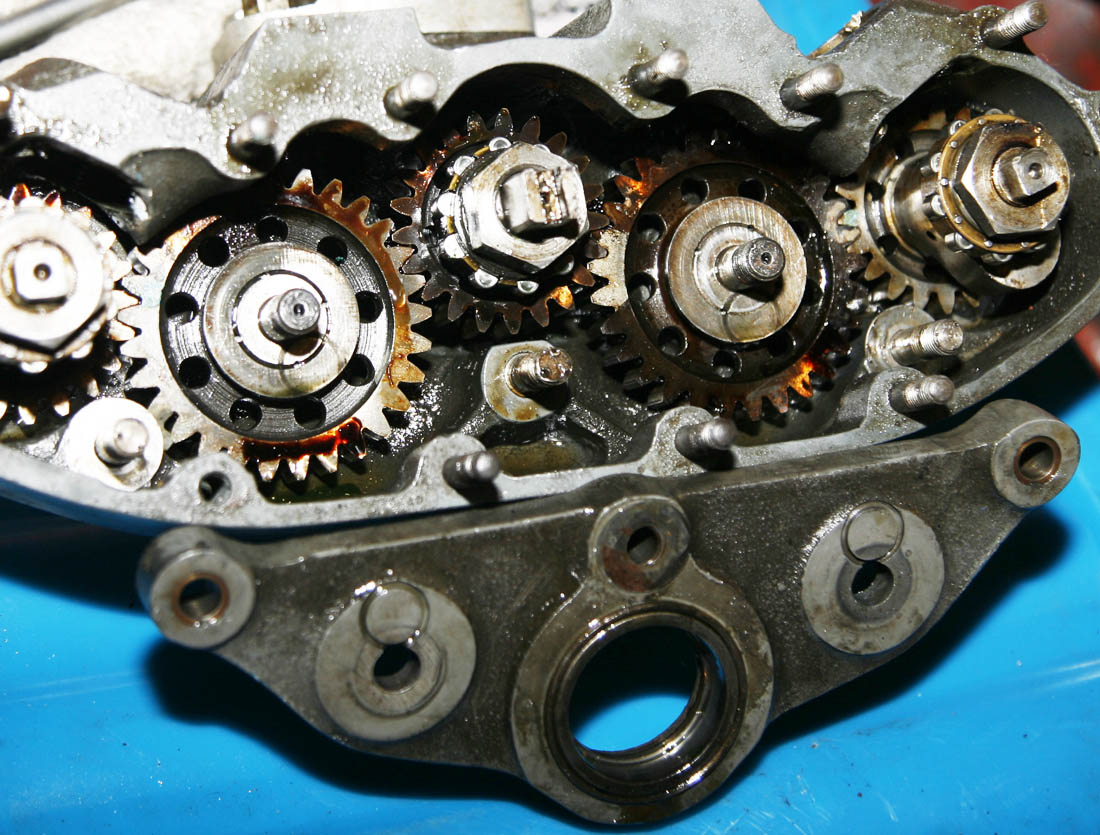
So this photo shows the cambox gear train with spindle outrigger plate removed. Note that the idler gears look like they have been preserved in yellow yacht varnish - but which is actually old 'treacled' Castrol R - not rust as it may look like in the photo.
An interesting design feature of this outrigger plate are the offset oil track grooves machined into the flats of the idler gear flats. Notice that the gears themselves have the same circular impressions - just confirming the gears have not been turned in many, many years!
A closer view of the idler and inlet cam gear show they are both drilled to reduce weight - as you would expect with a doubleknocker cambox. Oil on the idler gear looks very much past its prime - but as hoped, did a great job of protecting the gears themsleves.
This photo gives a better view of the oiling scroll/circle machined into the outrigger plate, and corresponding mark made on the idler gear wheel. If you look carefully you will see that the idler wheel also has a groove machined into the side shim with 4 small holes drilled in it, to allow oil to flow to the roller cage - all highlighting what a quality design this cambox was. Final design point to note - hard dowels pressed into the end of the outrigger plate to ensure all stays a very tight fit - and a bugger to remove!
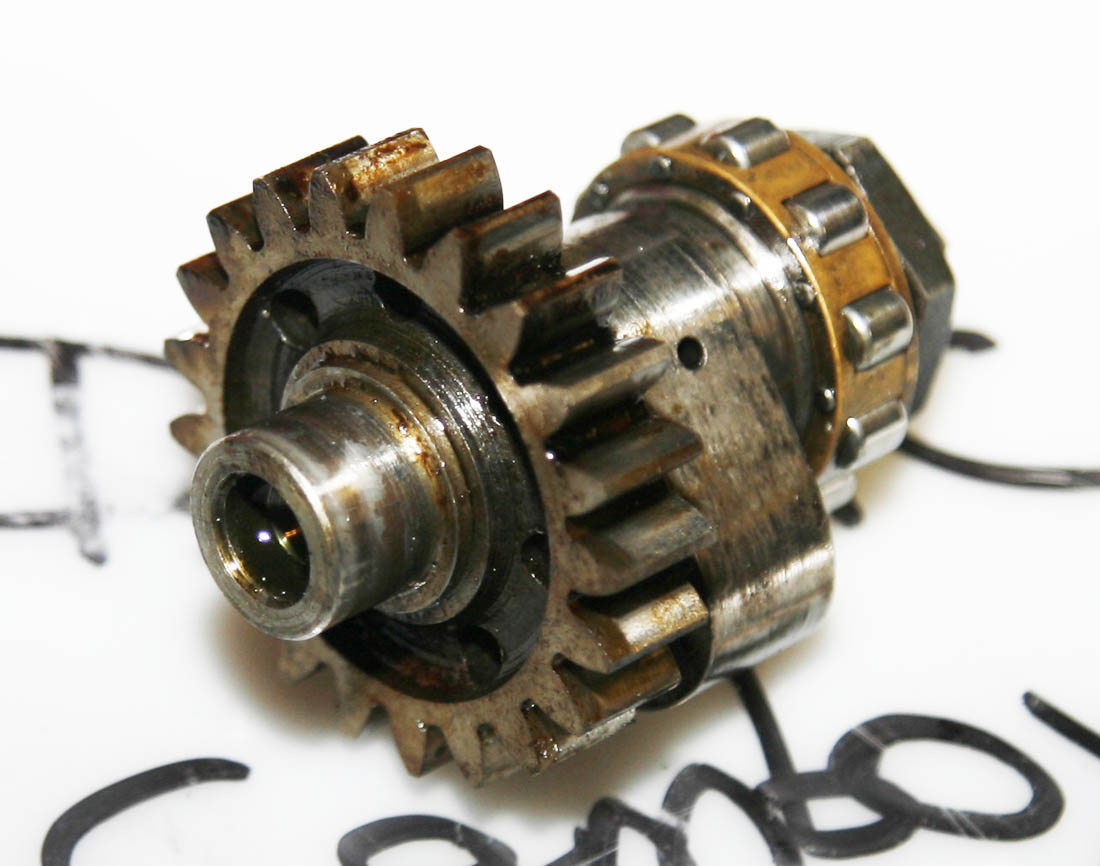
Complete DOHC camshaft assembly. Similar in general design to the SOHC camshaft assembly . . . it consists of camshaft, cam gear, cam, roller bearing and LH nut - so in itself quite a complex assembly. Interestingly - I was talking to a very knowledgable DOHC friend recently, about options for fitting this cambox to a Longstroke engine - he told me, it may be a tight fit to make it work - but the cams probably dont need changing - on Longstroke engines in the past he had sucessfully used shortstroke cams - interesting
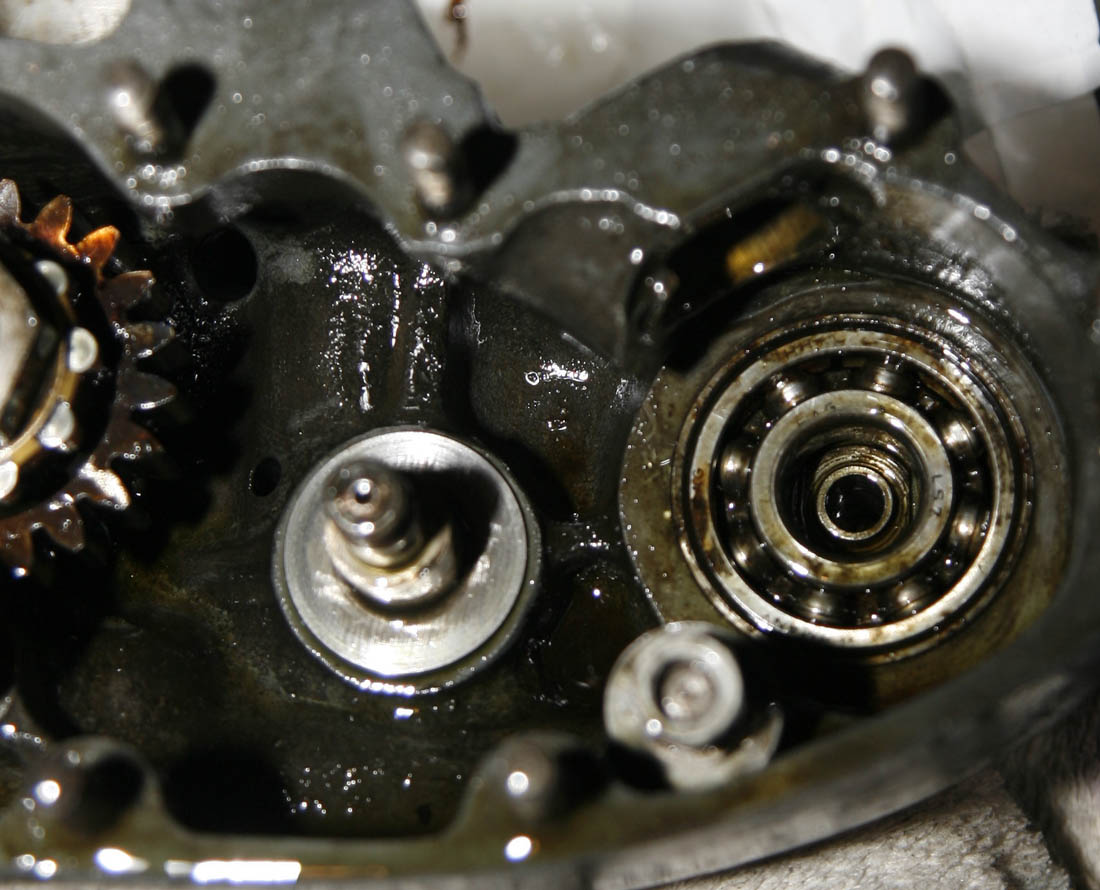
This closeup of the cambox casting exhaust side shows the idler spindle on the left - which looked relatively unworn and the main camshaft ball bearing still in situ. Behind it is the oil quill feed sleeve. The bronze quill in the previous photo is held against the rotating camshaft by the light pressure of the spring and ensures a constant oil feed to the cams through each camshaft. A similar oiling mechanism was used on SOHC racing cambox's, as well as the BigEnd feed of all Norton singles
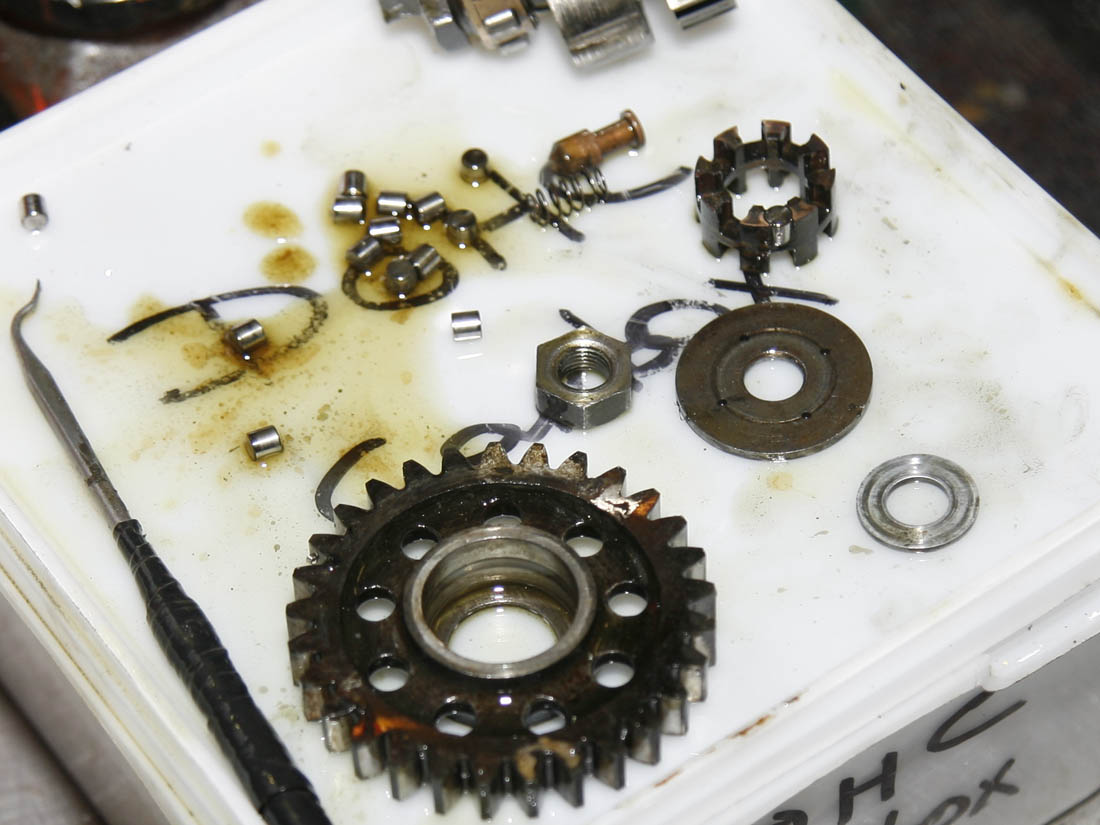
Idler gear removed and disassembled shows they were mounted on a spindle with a bronze cage and twin row of small rollers with hardened shims both side. The oil was added by myself. At the top of the photo is a small bronze plunger and spring - this is the oil quill removed from the oil feed nut on the camshaft spindle - see next photo on the right
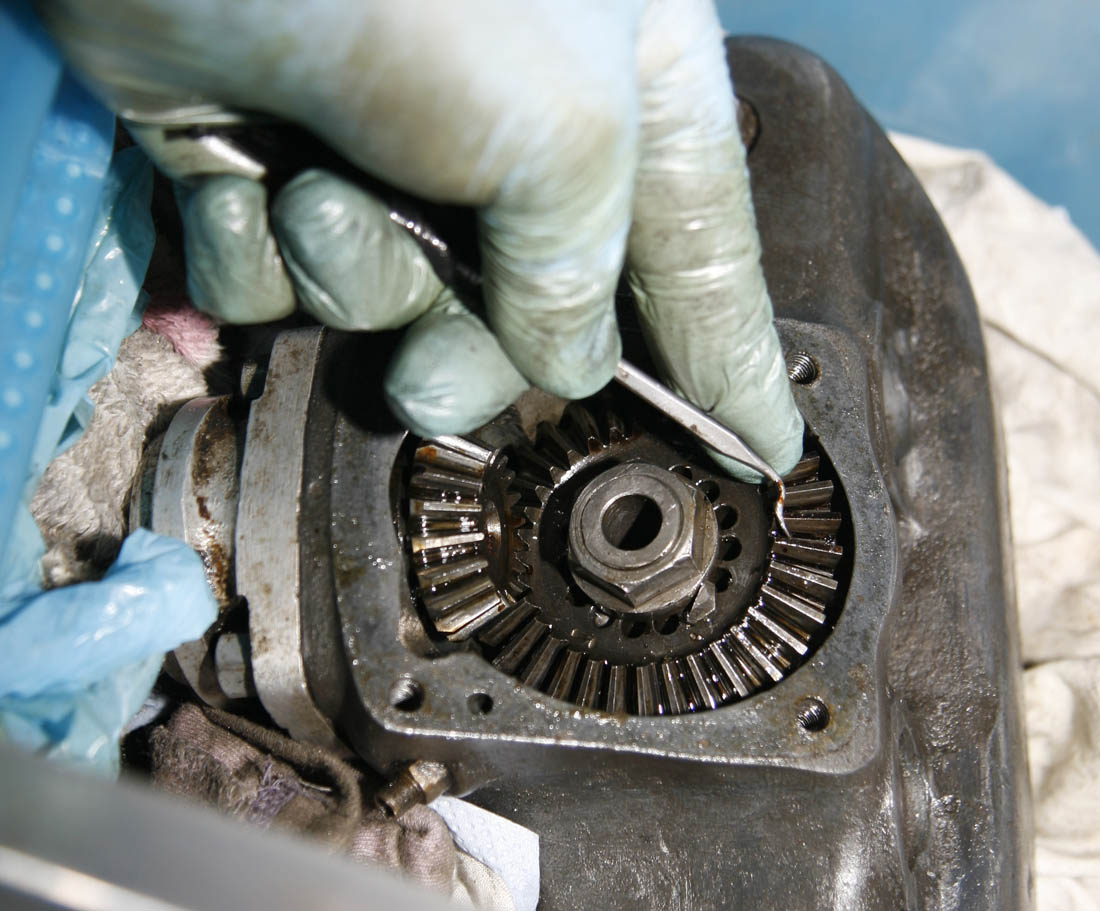
Moving to the front of the cambox - the bonus with purchasing this cambox was that it included the alloy vertical bevel casting and the top vertical bevel - a difficult item to find second hand these days. However, like everything else there was a thick layer of treacle like old Castrol R on all the teeth. Actually on this bevel gear it had gone beyond the treacle stage and was looking more like dried 'Araldite' glue! I am using a hand scraper to try and remove the worst of it, before attempting to undo the camshaft nut
Magnesium bevel cover on DOHC cambox is another item that differed significantly from the SOHC alternative. A standard Inter bevel cover in alloy does not have any oilways - as the oiling of cams relies on a seperate feed, which does not feed through the camshaft. The SOHC racing cambox had a feed that ran into this bevel cover (also in magnesium), but for the SOHC version the feed ran to the centre of the cover where the quill was mounted to feed the single central camshaft.
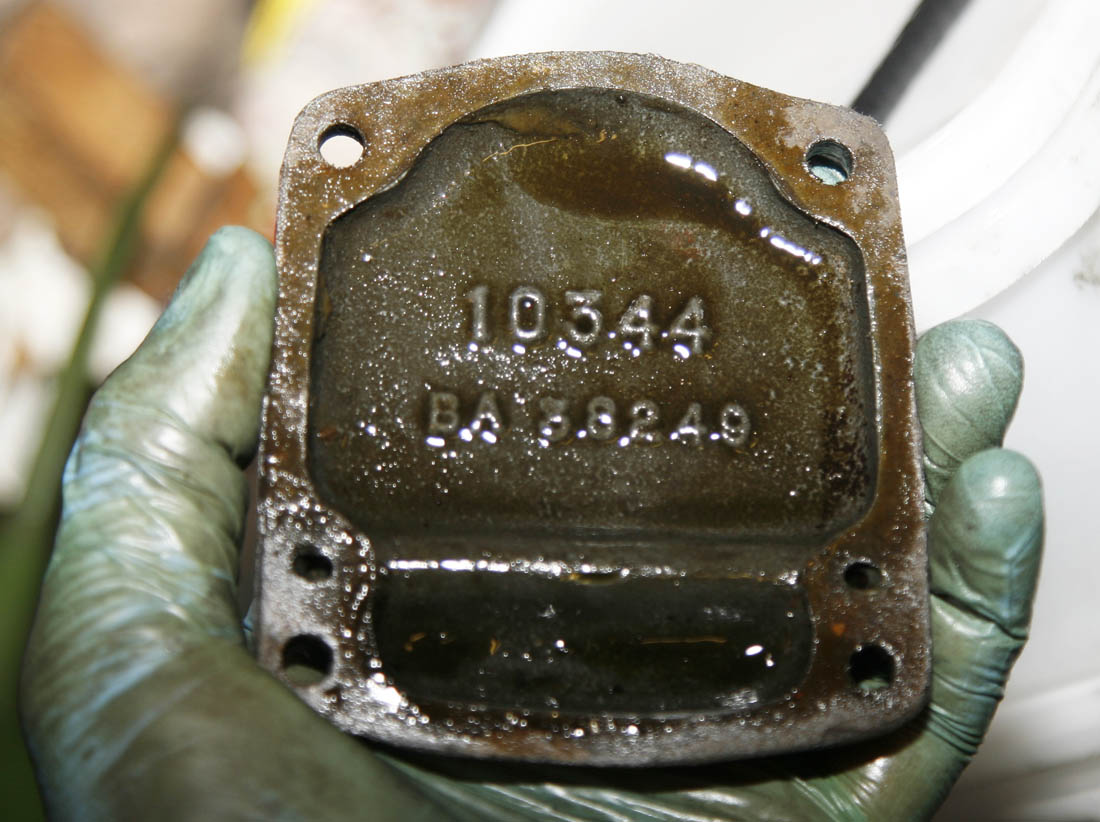
I think the the first number was the Norton part number, while the second BA number is I believe a casting number. As with most items on this cambox the condition of the cover was nice and crisp and looked almost new
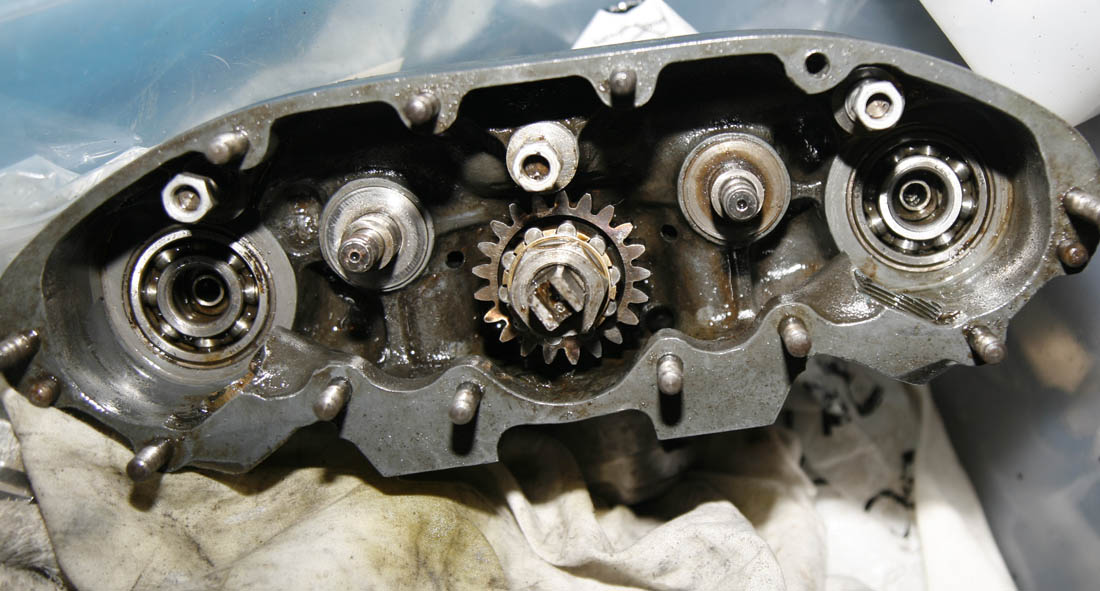
Final photograph shows the main cambox shell with camshafts and idler gears removed - and ready to remove central camshaft. In Part 2 of this article I will cover the removal of the camshaft - not as straight forward as I would have liked, and the replacement of the original pusher bearings - a job which looks to have been started by the previous owner, but not completed . . . with I am assuming, an approximate 50 year gap imbetween!
Progress So Far - and thinking of next stage
Following a pleasent Sunday afternoon stripping the cambox, I was feeling very chirpy about my recent Bonhams purchase. As well as enjoying stripping an original example of what is perhaps Norton's finest singular racing design, I was also very relieved to find there were no obvious horror stories inside.
In fact, quite the contrary - other than the obvioius need to replace the Pusher bearings - which I am assuming was the reason the cambox was originally stood up, there looked very little wrong with it, or that will need replacing.
This is good news, because although I dont mind spending money where necessary - any parts for this type of cambox are expensive.
Added to that, as time has moved on over the years , I
am now more reticent to replace parts just for the sake of it - preferring to keep things original if at all possible.
In Part 2 of this extended article I will cover the next stage of the stripdown, which includes removal of the central drive spindle and bevel gears, and then the less straightforward job of replacing the pusher bearings, before reassembly.
Click on the link to the next article below (but as I complete this article in early Feb 2020, it is still being written . . . so expect it sometime around late Feb.
Next Article: DOHC Cambox Stripdown Part 2 - Pusher Bearing Renewal
DOHC Cambox Stripdown
Part 2
Click on the photo on the right to take you
to next article:
DOHC Cambox Stripdown
Part 2